¶ Additional Resources
https://docs.madcapsoftware.com/flare2021r2/Flare-Getting-Started-Guide.pdf
¶ Overview
¶ Creating a New Project
- On the Start Page click New Project. Alternatively, you can select File > New Project.
- Complete the fields on the first page of the wizard and click Next.
- Project name Enter a name for the project.
- Project folder Keep the default location for the project, or click3e64226f-e68c-4e73-8b7a-2cf7203f0a00.png to select another.
- Language Select the primary language for the project.
- (Optional) Bind to Source Control Select this if you want to integrate the new Flare project with a source control application (such as Microsoft Team Foundation Server).
- (Optional) If you selected the "Bind to Source Control" option, click Bind Project. In the Bind Project dialog, complete the fields, depending on the source control application being used. When you are finished, click Next.
¶ Importing a Project
¶ Word Document
¶ Before you Start
- When you want to import Word files keep in mind that the cleaner a Word document is before import, the cleaner the documentation is after the import process. A clean document means: using an error-free Word document, removing any inline formatting, and using heading, paragraph, and/or character styles in Word.
- Before you begin, please note you can control the file names given to new topics that are created from imported Word documents. To do this, apply “Private” field codes to the appropriate headings in the Word documents where new topics will be created.
¶ Importing a Word Document
- Select Project > Import > MS Word Documents.
- In the wizard, choose either Import into a new project (and complete the fields below) or Import into this project. However, if you do not have a project currently open, the file(s) will automatically be imported into a new project.
- Project name Type a name for the new Flare project that will be created after you perform the import.
- Project folder Accept the default location for the new project or select a folder.
- Output type Select the primary target for your project
- A target is a file that generates output from your project. To ensure the file outputs in the intended way (and Behaves as desired). Flare lets you choose the best type of output to fit your needs. A target file is used for each instance of an output type.
- Click Add file to choose Word documents. You can also select other options as necessary.
- (Optional) On the left, select Styles. You can use this page for various style settings.
Additional Notes:
-
Use standard list style type This will use standard bullets (e.g., square, disc) and numbering (e.g., decimal), whether they were used in the Word documents or not.
If this is not enabled, lists are imported with the characters or symbols used for the lists in the Word documents. However, these are contained within span tags in the Flare topics. This allows you to keep special elements, (e.g., Wingdings) that you might have used in Word for custom lists.
¶ Style Mapping
[Establish Stylesheet?]
¶ Content and Features
¶ Topics
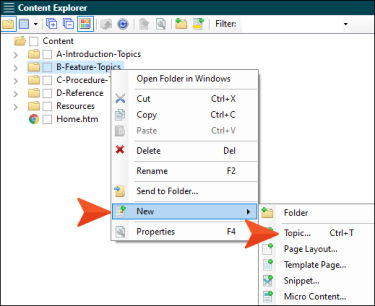
- In the Content Explorer, right-click on a folder and from the context menu select New > Topic.
- Select a template
- New From Template Choose either a factory template file or one of your own custom template files as a starting point. The new file will take on all of the settings contained in the template. If you want to use the factory template provided by Flare, expand the Factory Templates folder and click on a template file. If you want to use your own custom template file, expand the appropriate folder and click on a file. See Templates.
- NewTopic.htm This creates a regular topic with default text that you can replace. This is the template that you will select most of the time.
- TopicForEndnotes.htm This creates a topic with an Endnotes proxy, which can be used to generate a list of all your end notes (footnotes) when you build print-based output. See Creating an Endnotes Proxy.
- TopicForGlossary.htm This creates a topic with a Glossary proxy, which can be used to generate a list of all your glossary terms and definitions when you build print-based output. See Creating a Glossary Manually Using a Proxy.
- TopicForIndex.htm This creates a topic with an Index proxy, which can be used to generate an index when you build print-based output. See Creating an Index Manually for Print.
- TopicForListOfConcepts.htm This creates a topic with a Concepts proxy, which can be used to generate a list of all your concept keywords when you build print-based output. See Creating a List of Concepts.
- TopicForListOfElements.htm This creates a topic with a List-Of proxy, which can be used to generate a list of any kind of element you want when you build print-based output. See Creating a List of Elements.
- TopicForListOfImages.htm This creates a topic with a List-Of proxy, which can be used to generate a list of all of your images when you build print-based output. See Creating a List of Images.
- TopicForListOfTables.htm This creates a topic with a List-Of proxy, which can be used to generate a list of all of your tables when you build print-based output. See Creating a List of Tables.
- TopicForMiniTOC.htm This creates a topic with a mini-toc proxy, which can be used to generate a small table of contents when you build online or print-based output. See Creating a Mini-TOC.
- TopicForTOC.htm This creates a topic with a TOC proxy, which can be used to generate a full table of contents when you build print-based output. See Creating a TOC for Print-Based Output.
New From Existing Choose an existing file of the same type as a starting point for your new file. As with template files, your new file will take on all of the settings contained in the file you select. To use this option, use the Open File dialog to find a file, and double-click it.
In the File Name field type a new name for the topic.
(Optional) You can complete additional fields at the bottom of the dialog.
-
1st Heading If you want the heading for the topic to use the same text that you provide for the file name, leave this field blank. Otherwise, enter the text that you want to use for the heading in the topic.
-
Title You can give the topic a title for the file. This does not refer to the visual title (or heading) at the top of the topic. Rather, it refers to the properties title for the topic (see Changing Topic Titles). If you leave this field blank, the text from the “1st Heading” field will be used for the title.
-
Stylesheet Select a stylesheet to associate with the new topic. If you do not have a stylesheet in your project, this field remains blank. This field is disabled if you have applied a primary stylesheet.
-
Style If you want the heading for the topic to use the default h1 style, leave this field blank. Otherwise, select a style to apply to the heading in the topic.
-
Condition Tags If you want to apply condition tags to the file, expand the Attributes section at the bottom of the dialog. Next to the Condition Tags field, click
and select the conditions you want to apply. Click OK.
-
File Tags If you want to apply file tags, expand the Attributes section at the bottom of the dialog. Next to the File Tags field, click and select the file tags you want to apply. Click OK.
-
Click Add
¶ Images
Note: If you import Microsoft Word documents containing embedded images into a project, Flare places copies of those image files in subfolders within the Resources > Images folder. This is done in order to avoid naming conflicts with embedded images from other Word documents that you might import. The subfolders are named after the Word documents being imported.
Note: If you apply certain special effects or artwork (e.g., arrows) to images in Word and then import them into Flare, those effects will not be retained. For example, a rotated image will return to its straight, original state. However, there are some workarounds that may allow you to keep the effects or artwork. One solution is to apply another effect such as a shadow or 3-D to the image in Word (e.g., add a shadow to a rotated image that you want to keep). This forces Word to save the image as an entirely new image with the effects. Another possible solution is to save the Word document as a web page, manually copy that HTM file into the Flare folder, and then open it within Flare. As for text floating around images, this effect is not supported in Flare. When you import from Word, the text is added below the image.
- Do one of the following, depending on the part of the user interface you are using:
- Right-Click In the Content Explorer, right-click on a folder and from the context menu select New > Image.
- Ribbon Select Project > New > Image.
- Click the File Type field at the top of the dialog and select Image.
- In the Source area select to add a new file from a template or choose an existing one. For images, you most likely will select New From Existing, then select the file.
- (Optional) The Folder field is automatically populated with the folder that has focus in the Content Explorer. If you want to place the file into a folder that you previously created in the Content Explorer, in the Folder field click and select the subfolder. Otherwise, keep the default location
- In the File Name field, type a new name for the image file.
- If you want to apply condition tags to the file, expand the Attributes section at the bottom of the dialog. Next to the Condition Tags field, click and select the conditions you want to apply. Click OK.
- If you want to apply file tags, expand the Attributes section at the bottom of the dialog. Next to the File Tags field, click and select the file tags you want to apply. Click OK.
- Click Add. The image file is added to the Content Explorer.
¶ Inserting Images
Note: You can insert images into content files (e.g., topics, snippets). Flare supports the following types of raster and vector image files: BMP, EMF, EPS, EXPS, GIF, HDP, JPG, JPEG, PDF, PNG, PS, SVG, SWF, TIF, TIFF, WDP, WMF, XAML, XPS.
When inserting an image not saved into
How to Insert an Image Hyperlink
- Open the content file.
- In the XML Editor, right-click the image that you want to use as a hyperlink.
- In the context menu, select Hyperlink Image. The Insert Hyperlink dialog opens.
- From the Link to drop-down field, select a way to identify the topic, bookmark, or file to which you want to link. Based on the option you choose, the section below gives you a list of selections or additional fields to complete.
¶ Tables
¶ How to Create a Table Using the Insert Table Grid
-
In the XML Editor place your cursor where you want to add the table.
-
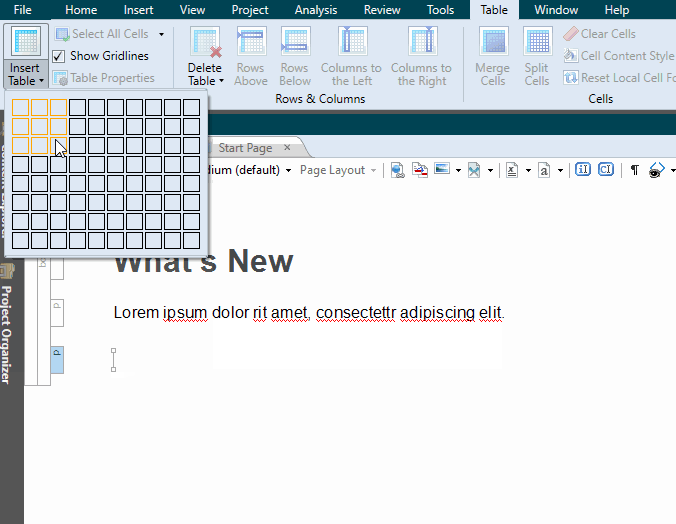
Select Table > Insert Table (down arrow).
-
Hover over the grid. When you do this, the squares change color to indicate how many rows and columns will be included in the table. As soon as you click, the new table is inserted.
The table initially looks very plain because it has no properties or stylesheet associated with it. Therefore, you will likely want to open the Table Properties dialog at some point to specify settings and/or apply a table stylesheet to it.
¶ Editing Tables
Here are the primary ways to edit tables using styles:
- Regular Stylesheets You can modify the look and feel of multiple tables at once by editing standard HTML table styles (e.g., table, th, td, tr) in your regular stylesheet. For example, you might use these styles in order to control the look of the text that appears in your table headings (th style) or within the cells (td style).
- Table Stylesheets You can modify the look and feel of multiple tables at once by editing the properties in a custom table stylesheet. These table stylesheets let you easily and quickly create patterns and different looks for tables
¶ Indexes
¶ How to Add an Index Keyword or Subkeyword
Do one of the following, depending on the part of the user interface you are using:
- Ribbon Select View > Index Window.
- Keyboard Shortcut Press F9.
The Index window pane opens. The window pane is split into two sections—the Terms area at the top and the Explorer area at the bottom. If you want to see more or less of either section, you can click the splitter between them and drag it up or down.
Do one of the following, depending on whether you are adding a first-level keyword or a second-level index keyword:
-
First-Level Keyword Right-click the explorer area at the bottom of the window pane, and select Add Top-Level Keyword from the context menu.
OR
-
Second-Level Subkeyword In the explorer area at the bottom of the window pane, right-click an existing top-level keyword. From the context menu select Add Sub-Keyword.
Type the index keyword as you want it to appear in the index.
Press ENTER.
¶ Lists
From the Content Explorer, open the stylesheet that you want to modify.
From the Medium drop-down in the Stylesheet Editor, make sure the proper medium is selected before you begin. In the Advanced view, you can open multiple mediums at once; you just need to look at the title at the top of the medium pane and make sure you are working in the correct one. If you are not using stylesheet mediums for your different outputs or if you want all mediums to have the same settings, just leave the medium set to default and continue.
Mediums can be used if you want to use one group of settings for online output types and another group of settings for print-based output types. For example, you might use the default medium for your online outputs and the print medium for your print outputs.
Please note that Flare remembers the last medium that you used when working in the stylesheet, so it may or may not be the one that you want to use the next time around.
¶ Tables of Contents
In most situations, you will have one TOC that you use for a particular output (target). In that case, you simply associate the appropriate TOC with the target. If you have multiple TOCs that you want to include in the same project or output target, the TOC that you associate with the project or target serves as the primary TOC. In your primary TOC, you have the option of creating links to the other TOC that you want to include in the output. If you do not select a TOC, Flare will use the first one in the project (if there is more than one). If you have specified a primary TOC at the project level and another at a target level, the TOC at the target will take precedence.
¶ How to Associate a Primary TOC With a Project
- Select Project > Project Properties. The Project Properties dialog opens.
- Select the Defaults tab.
- Click in the Primary TOC field, and from the drop-down, select the TOC.
- Click OK.
- Save Files
¶ How to Associate a Primary TOC With a Target
- From the Project Organizer, open the target.
- On the General tab in the Target Editor, click the drop-down arrow in the Primary TOC field, and select the TOC that you want to associate with the target.
- Save Files
¶ Editor Tools
You can use macros in Flare to automate frequently used commands or processes. After you record a macro, you can play it back to perform all of the steps in the macro with a single action. You can also assign a shortcut to the macro , add it to the Quick Access Toolbar, or access it from the Quick Launch bar
¶ Keyboard Shortcuts
¶ Designing
¶ Styles and Stylesheets
Styles are used to control the look and feel of your documentation, and keep the content separate from its presentation. The styling is based on cascading stylesheets (CSS)
MadCap-Specific Styles and Properties
¶ Page Layouts and Styles
The general rule is that page layouts are recommended for print-based output, and template pages continue to be the best method for automatically adding headers, footers, breadcrumbs, and more in multiple topics for online output.
You can add as many page layouts to a project as you need for generating print-based output. If you want to create a manual where the page headers and footers, orientation, page size, and margins are different for various parts of the manual, you will need multiple page layouts. If the page header and footer content, as well as the configuration, are the same for all pages in the manual, you only need one page layout.
¶ Template Pages
A template page lets you automatically apply certain content—such as breadcrumbs, menus, toolbars, search bars, mini-TOCs, or footer text—to multiple topics in the output.
You can add as many template pages to a project as you want. A template page lets you apply consistent content to topics and is contained in a file with an .flmsp extension. The traditional location to store a template page in the Content Explorer is in the Resources > TemplatePages folder. However, you can store it anywhere in the Content Explorer that you like.