¶ Script for Full Development Environment Install (V2)
¶ Ninite
Now I'm going to open the default browser (IE or Edge) and use it to go to Ninite where I can get a single install package that will install a bunch of programs for me instead of having to do them myself. Go to ninite.com and then check the following applications:
+-------------------------------------------------------------+------------------------------------------------------------------------------------------------------------------------------------------------------------------------------+
|Screenshot |Description |
+-------------------------------------------------------------+------------------------------------------------------------------------------------------------------------------------------------------------------------------------------+
|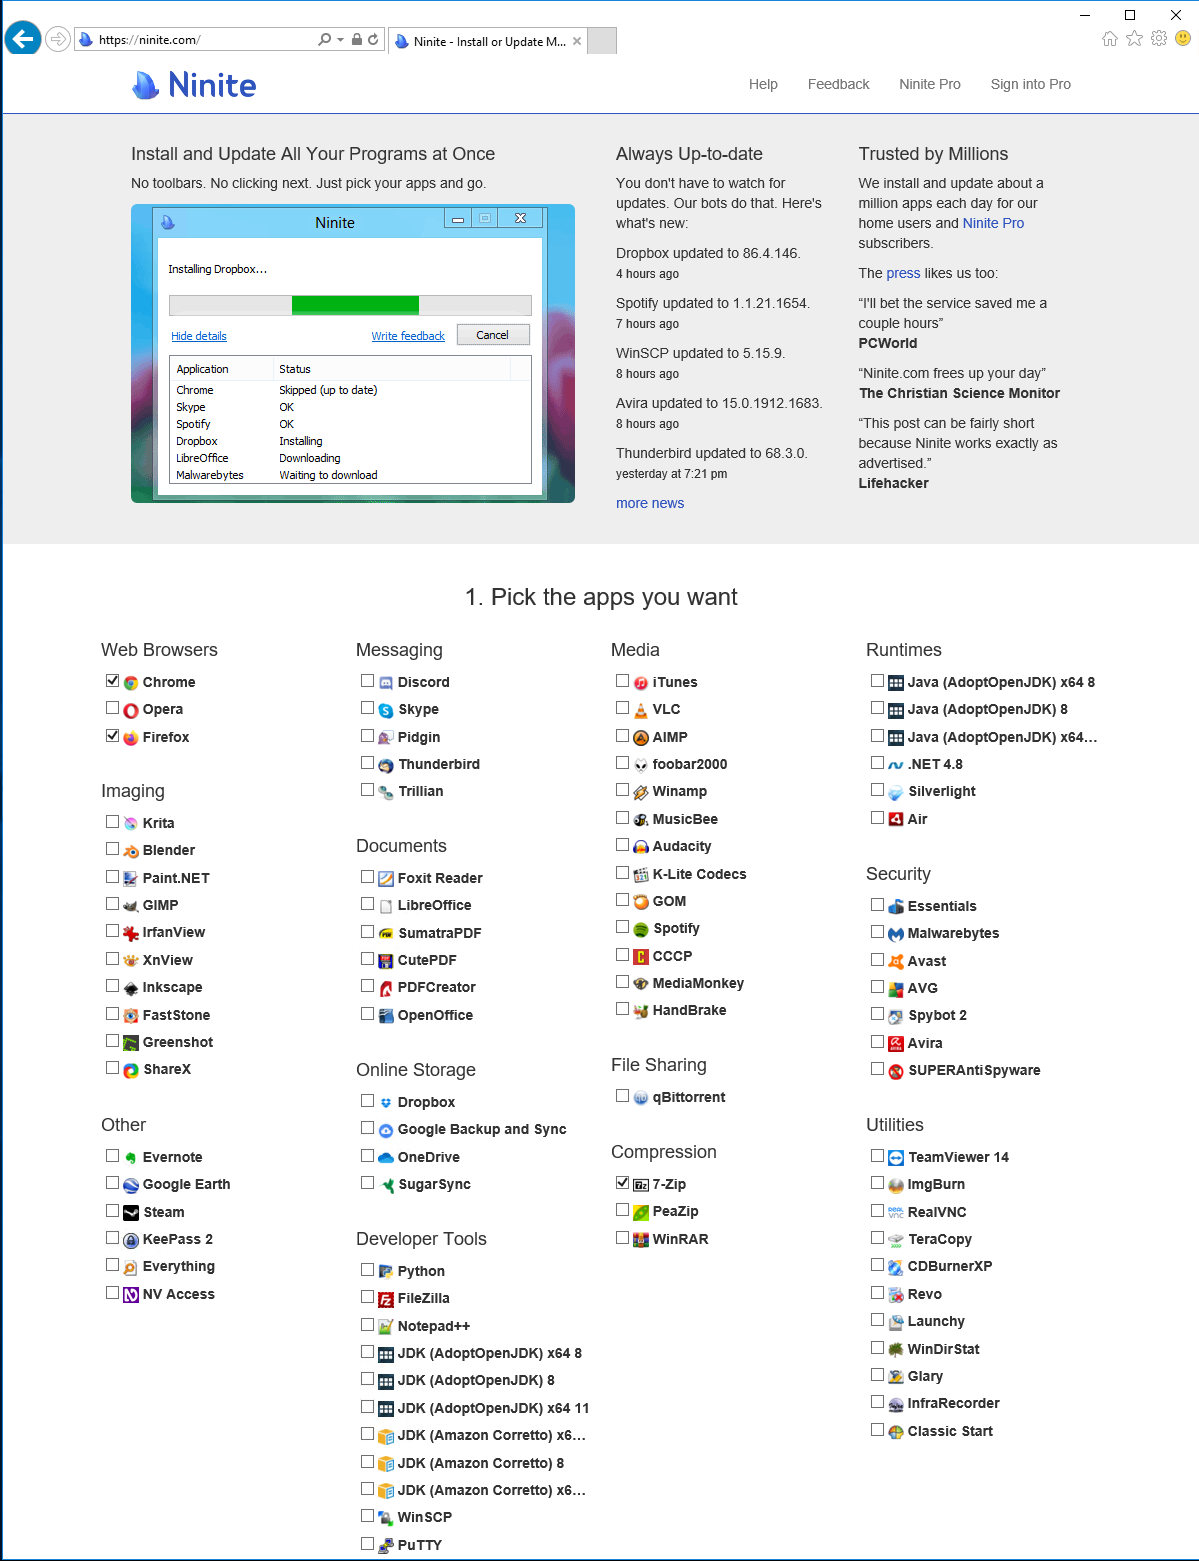 |- Chrome\ |
| |- Firefox\ |
| |- 7-Zip\ |
| |- .NET 4.8\ |
| |- Notepad++\ |
| |- WinMerge\ |
| |- Visual Studio Code |
+-------------------------------------------------------------+------------------------------------------------------------------------------------------------------------------------------------------------------------------------------+
|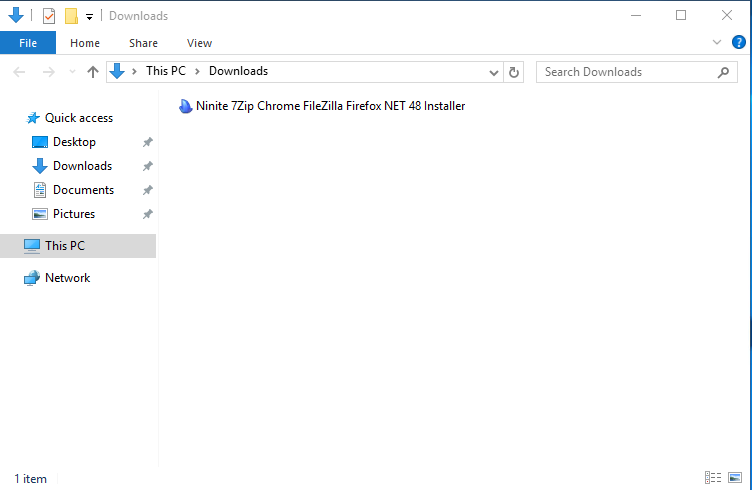 |Now download the package and save it to the Downloads folder.\ |
| |\ |
| |Open File Explorer and navigate to the Downloads folder.\ |
| |\ |
|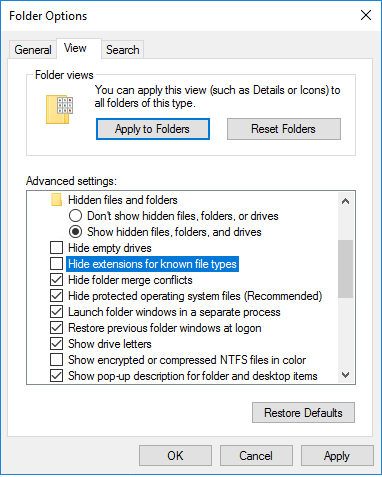 |We can take care of a couple of settings while we are here:\ |
| |1. Right-click the whitespace under Network in the left side-bar and select Expand to current folder. This will let the side-bar follow you as you navigate folders.|
| |2. I normally also select Show all folders.\ |
| |3. I normally unpin all of the folders under Quick access.\ |
| |4. Change to List View.\ |
| |5. Click View > Options.\ |
| |6. Change Open File Explorer to This PC.\ |
| |7. Uncheck Show recently used files in Quick access and Show frequently used folders in Quick access.\ |
| |8. Click Apply.\ |
| |9. Switch to the View tab.\ |
| |10. Click Apply to Folders.\ |
| |11. Change Hidden files and folders radio toggle to Show....\ |
| |12. Uncheck Hide empty drives, Hide extensions for known file types.\ |
| |13. Check Launch folder windows in a separate process and Restore previous folder windows at logon.\ |
| |14. Click OK. |
+-------------------------------------------------------------+------------------------------------------------------------------------------------------------------------------------------------------------------------------------------+
|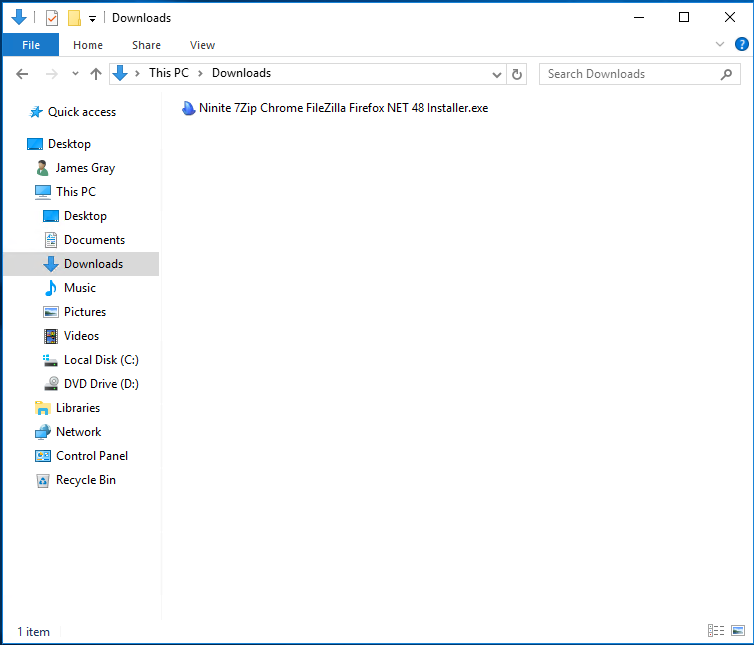 |Close File Explorer and reopen it and navigate back to the Downloads folder. It probably looks like the screenshot to the left now. |
| | |
| |
|
+-------------------------------------------------------------+------------------------------------------------------------------------------------------------------------------------------------------------------------------------------+
|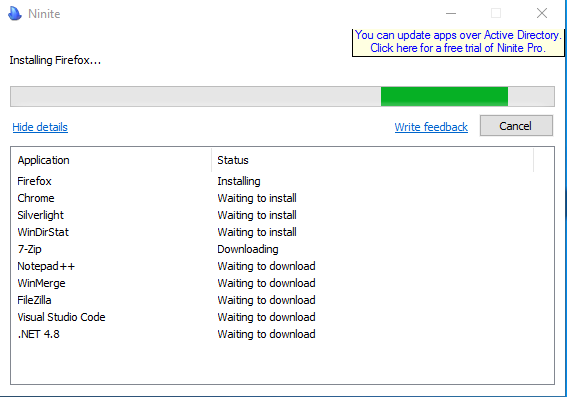 |Right-click the Ninite package and Run as Administrator. Click Show details in the bottom left when the window comes up (there will be a prep window first). |
+-------------------------------------------------------------+------------------------------------------------------------------------------------------------------------------------------------------------------------------------------+
¶ IIS
Next, we want to install and configure IIS. To do this, we have to go to Windows Features and turn it on with the settings we want. The end of this will require a reboot, so be careful not to trigger it unless the other installs from Ninite are at a stopping point.
| Screenshot | Description |
|---|---|
| For Windows 10 Look for Internet Information Web Services and when you check that with the spacebar, it automatically selected certain things but not others and we need to make some choices that are not the defaults. - Turn off FTP Server - Turn on Common HTTP Features - Turn on Health and Diagnostics - Turn on Security - Turn on WCF - Turn on HTTP Redirect - Turn on WebDAV - You can optionally include IIS 6 if you need a local mail server, but I don't recommend it as it's not worth doing. | |
| Right-click the Start Pearl and select Programs and Features then click Turn Windows Features on or off from the left side-bar. | |
| If the first screen you get is Before you begin, you can check Skip this page by default and then click Next. Choose Role-based or feature-based installation and click Next. Choose Select a server from the server pool and ensure that the local box is highlighted in the Server Pool box and click Next. Choose Web Server (IIS) from the list of Roles and click Next. | |
| Check the following Features if they are not checked: - .NET Framework 3.5 Features - Everything under .NET Framwork 4.6 Features except Message Queuing (MSMQ) activation - IIS Hostable Web Core - WebDAV Redirector Click Next. | |
| Click Next again to see Role Services. Expand the entire tree so you can see it all at once and check the following options if not already checked: - Everything under Common HTTP Features - Everything under Health and Diagnostics - Everything under Performance - Everything under Security - Everything under Application Development - IIS Management Scripts and Tools - Management Service - You can optionally include IIS 6 if you need a local mail server, but I don't recommend it as it's not worth doing. |
Click Next. Click Install. After continuing from this, it should download anything it needs from the internet and run the install.
¶ Completion Check
Since we have configured several installs to run by now, we need to do a completion check here to ensure that they have all finished, including any reboots, until there are no further updates before continuing on to the next section.
¶ Continuing Software Installs and Setups
- SQL2019
-
If you are asked to sign in from this link, use your corporate email, which is also your MSDN account.
- If your login isn't active in MSDN yet, get Ben Swindle to assist you in completing the setup.
-
From the Download button on the right of this link's page choose the one without advanced services

-
- A download of over 400 MB should start
-
On completion, go to your Downloads folder and right-click > Run as administrator

-
- Click Ok
-
Let the Self Extractor complete, when it does, it will automatically open the Installation Center

-
- Click the first item: New SQL Server stand-alone...
- Accept the license terms
- Click Next
- On Install Rules, click Next
- On Feature Selection, click Next
- On Instance Configuration, change "SQLExpress" to "SQL2019" and press Tab (the ID should automatically update)
- Click Next
- On Server Configuration, click Next
- On Database Engine Configuration, change Authentication Mode to Mixed Mode
- Enter "p4ssw0rd!" as the new sa password
- Click Next
- The install will run
- After completion, click Close
- Close the Installation Center
- SSMS 18+
- Click the download link Download SQL Server Management Studio (SSMS)
- On completion, go to your Downloads folder and right-click > Run as administrator
- Click Install
- Let the installer run
- It will ask you to restart, wait for other installs to be at a stopping point and then let it.
- Visual Studio 2022
- Download the appropriate version from the above link Visual Studio Professional 2022
- Front End Team Members: Visual Studio Professional 2022
- Back End Team Members: Visual Studio Enterprise 2022
- You don't need to grab a license key, it will read it when you sign in to Visual Studio after install
- Download the installer
- Right-click > Run as Administrator
- Click Continue
- Let the Visual Studio Installer installer run
- The Visual Studio Installer will open automatically and start the install configure window
- Check .NET desktop development
- Check ASP.NET and web development
- Check Data storage and processing
- Click the Individual Components tab at the top
- Check .NET 5.0 runtime
- Check .NET 6.0 runtime
- Check .NET Core 2.1 runtime
- Check .NET Core 3.1 runtime
- Check .NET Framework 3.5 development tools
- Check .NET Framework 4 targeting pack
- Check .NET Framework 4.5 targeting pack
- Check .NET Framework 4.5.1 targeting pack
- Check .NET Framework 4.5.2 targeting pack
- Check .NET Framework 4.6 targeting pack
- Check .NET Framework 4.6.1 SDK
- Check .NET Framework 4.6.1 targeting pack
- Check .NET Framework 4.6.2 SDK
- Check .NET Framework 4.6.2 targeting pack
- Check .NET Framework 4.7 SDK
- Check .NET Framework 4.7 targeting pack
- Check .NET Framework 4.7.1 SDK
- Check .NET Framework 4.7.1 targeting pack
- Check .NET Framework 4.7.2 SDK
- Check .NET Framework 4.7.2 targeting pack
- Check .NET Framework 4.8 SDK
- Check .NET Framework 4.8 targeting pack
- Check .NET Framework Project and Item Templates
- Check .NET SDK
- Check .NET Web Assembly Build Tools
- Check LINQ to SQL tools
- Check NuGet targets and build tasks
- Click Install in the bottom right
- It should download and install which will take some time
- At the end, it should open the sign-in prompt for the first time Visual Studio is opening
- Sign in using your corporate email and password
- Let Visual Studio come all the way up and then you can close it for now
- Close Visual Studio Installer
- The .NET 4.6.2 SDK that gets installed doesn't always work correctly, so get the direct package for it and install it:
- Download the appropriate version from the above link Visual Studio Professional 2022
- Node
- Get the latest release of NVM and install it
- You will want to install node version 11.15.0 for Angular (CEF 2021.4 and earlier) and 16.9.1 for React (CEF 2022.2 and later)
- To configure nvm open up a terminal as admin and do the following as needed:
- Type nvm install <version> to install a version of node
- Type nvm current to display the active version
- Type Nvm list to see which versions you have installed
- Type nvm use <version> to use a specific version you have installed
- Get the latest release of NVM and install it
- Redis
- Expand the Assets under 3.2.100 Pre-Release and download
Redis-x64-3.2.100.msi - Go to Downloads and Right-click > Install
- Run the install with all of the defaults
- Expand the Assets under 3.2.100 Pre-Release and download
- ElasticSearch
- If the link doesn't work, go to CVI - CEF in MS Teams, then Files and the ElasticSearch.7z should be downloadable from General > Misc > Misc
- Extract the zip's contents to a folder
- Follow the instructions inside the
ReadMe.txtfile- You CANNOT use a different version of Java JRE
- I suggest putting kibana in the C:\Data\Tools\kibana directory
- Add kibana content
- Install Gulp globally via Command Prompt:
npm install --global gulp-cli
Restart the system to cement the recent changes and update PATH environment variables, this is important for the next steps.
¶ Development Code Setup
-
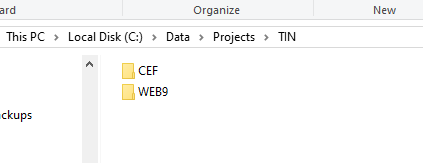
Create Project Folders on your local
- Naming conventions: By convention, Clarity stores repositories in the "C:\Data\Projects\" folder on the servers. You can arrange them on your local however you want, so long as you can recognize them without adding extensive time to your work day.
-
Extract the code like below so its C:\Data\Projects\TIN\CEF and C:\Data\Projects\{ProjectAcronymn}\WEB9
-
Create a Symbolic Link in Windows (sort of a virtual directory for the OS itself) for the Skin by running the following command in an command prompt running as administrator:
mklink /D "Link" "Target"- For Example:
cd "C:\Data\Projects\{ProjectAcronymn}\WEB9\Portals\_default\Skins\"mklink /D "Clarity-Admin"
¶ Development Site Setup (Instructions in progress!)
¶ Set up the Web Server
- Open IIS Manager (Start > Windows Administrative Tools > IIS Manager) or Start > type "iis" > press Enter
- Click Get New Web Platform Components
- A browser page asking if you want to download and install WEB Platform Installer, do so and follow it's install process
- Close IIS Manager
- Open IIS Manager again
- Click Get New Web Platform Components
- This time a modal will open instead of a browser page
- Click the Products tab
- In the search box, type "Url Rewrite" and press Enter
- Click the Add button for Url Rewrite 2.1
- Click Install and let it finish, then exit out of this modal
¶ Set Application Pool defaults
- In IIS, expand the server name so you can see Application Pools and Sites
- Click on Application Pools
- In the right side-bar, click "Set Application Pool Defaults..."
- Set ".NET CLR Version" to "v4.0"
- Set "Start Mode" to "Always Running"
- Set "Process Model > Identity" to "Network Service"
- Set "Process Model > Idle Time-out (minutes)" to "0"
- Set "Recycling > Regular Time Interval (minutes)" to "0"
- Click "OK"
¶ Add Application Pools
Click "Add Application Pool..." 5 times and enter the following names:
- "ClarityClient.com (proj-local.) (DNN)"
- "ClarityClient.com (proj-local.) (API)"
- "ClarityClient.com (proj-local.) (API-Storefront)"
- "ClarityClient.com (proj-local.) (Reporting)"
- "ClarityClient.com (proj-local.) (Scheduler)"
- Go to advanced settings for this pool and set Start Mode to Always Running
- Ensure the app pools are all turned off
¶ Add "DNN" site
Click "Add Website..."
- For "Site Name:" enter "ClarityClient.com (proj-local.)"
- Click "Select...", choose the "ClarityClient.com (proj-local.) (DNN)" application you created above from the dropdown menu
- Click OK
- For "Physical path:" enter "C:\Data\Projects\2019.3_DEV\WEB" or whatever equivalent path you have on your local drive
- For "Host name:" enter "proj-local.clarityclient.com "
- Click OK
- Select the new "DNN" site in the "Connections" panel, then click "Configuration Editor"
- Click the "Section" dropdown at the top and choose "system.webServer/rewrite/allowedServerVariables"
- Click the "..." (for Collection) and add the following names:
- ORIGIN_HOST
- RESPONSE_Access-Control-Allow-Origin
- Close the modal
- Click Apply on the "Actions" panel
¶ Add "API" virtual application
In the "Connections" panel, right-click on the "Sites > DNN > DesktopModules > ClarityEcommerce" folder, then click "Add Application..."
- For "Alias:" enter "API"
- Click "Select...", choose "API" from the dropdown menu, then click "OK"
- For "Physical path:" enter "C:\Data\Projects\2019.3_DEV\CEF \06.Clarity.Ecommerce.Service" or the equivalent path for your local
- Check "Enable Preload"
- Click OK
¶ Add "API-Storefront" virtual application
In the "Connections" panel, right-click on the "Sites > DNN > DesktopModules > ClarityEcommerce" folder, then click "Add Application..."
- For "Alias:" enter "API-Storefront"
- Click "Select...", choose "API-Storefront" from the dropdown menu, then click "OK"
- For "Physical path:" enter "C:\Data\Projects\2019.3_DEV\CEF \06.Clarity.Ecommerce.Service.Storefront" or the equivalent path for your local
- Check "Enable Preload"
- Click OK
¶ Add "Scheduler" virtual application
In the "Connections" panel, right-click on the "Sites > DNN > DesktopModules > ClarityEcommerce" folder, then click "Add Application..."
- For "Alias:" enter "Scheduler"
- Click "Select...", choose "Scheduler" from the dropdown menu, then click "OK"
- For "Physical path:" enter "C:\Data\Projects\2019.3_DEV\CEF \07.Clarity.Ecommerce.Scheduler" or the equivalent path for your local
- Check "Enable Preload"
- Click OK
¶ Add "Reporting" virtual application
In the "Connections" panel, right-click on the "Sites > DNN > DesktopModules > ClarityEcommerce" folder, then click "Add Application..."
- For "Alias:" enter "Reporting"
- Click "Select...", choose "Reporting" from the dropdown menu, then click "OK"
- For "Physical path:" enter "C:\Data\Projects\2019.3_DEV\CEF \07.Clarity.Ecommerce.Reporting" or the equivalent path for your local
- Click OK
¶ Add "UI" virtual directory
In the "Connections" panel, right-click on the "Sites > DNN > DesktopModules > ClarityEcommerce" folder, then click "Add Virtual Directory..."
- For "Alias:" enter "UI"
- For "Physical path:" enter "C:\Data\Projects\2019.3_DEV\CEF\08.Clarity.Ecommerce.UI" or the equivalent path for your local
- Click OK
¶ Add "documentation" virtual directory
Right-click the "UI" virtual directory created above, then click "Add Virtual Directory..."
- For "Alias:" enter "documentation"
- For "Physical path:" enter "C:\Data\Projects\2019.3_DEV\CEF\08.Clarity.Ecommerce.APIReference" or the equivalent path for your local
- Click OK
¶ Add "Ecommerce" (images) virtual directory
In the "Connections" panel, right-click on the "Sites > DNN > images" folder, then click "Add Virtual Directory..."
- For "Alias:" enter "ecommerce"
- For "Physical path:" enter "C:\Data\Projects\2019.3_DEV\Images" or the equivalent path for your local
- Click OK
¶ Setup the Web Server (continued)
Update Windows hosts file
- Run any text editor/IDE as an administrator
- Open "C:\Windows\System32\drivers\etc\hosts"
- Add "127.0.0.1 ['DNN' site host name]" at the bottom
- Close and save changes
These instructions have been verified up to this point. From here there are general guide points but the exact step-by-step instructions have yet to be completed. There are multiple guides and videos which can walk you through this part.
¶ Partially Verified Setup Instructions for your Local
- Pulling a database backup of DNN to local
- Add DNN Portal Alias
- DNN cache loading issue
- Pull the config files into CEF/WEB folders, especially rewrite configs
- DNN Connection string
- CEF Connection string
- CEF App Settings
- Old vs New
- CEF Gulp Config
- Old vs New
- Restart the app pools after *.config changes so it picks up the new values
- Setting up connections to all the different instances in SSMS
- Run
npm_uber_install.batto restore packages - Gulp and running Tasks, including watches
- Older tasks vs new ones
- First time load CEF solution
- Must Run as Administrator to attach to w3wp.exe
- Loading the tool windows
- Unit Test Explorer Window
- Unit Test Sessions Window
- Task Runner
- DataModel as startup project for package manger console
- Unloading Projects as last resort
- Config the Error List window (Group by Project, File; Remove Suppression State, Project, File; Add Column)
- Some Default Provider stuff (good examples)
- ReSharper Performance Tools
- Restore NuGet Packages
- Build Solution
- Run Update-Database for EntityFramework
- Run the Seed Database tests
- Injecting the Translations to CEF
- Opening in the browser
- Common websites to keep open
- FontAwesome 5 vs 4
- Turn on DNN App Pool
- DNN Page loaded
- Dev Tools open and config
- Turn on API App Pool
- Fixing configs
- Restart the app pools after *.config changes so it picks up the new values
- Turn on API App Pool
- Getting to CEF Admin
- Default CEF Sign ins
- Run elastic index from CEF Admin
- Turn on Scheduler App Pool
- Review Scheduler locations (Direct and Embedded)
- Turn on Reporting App Pool
Clarity Application Setup Guide v2.4, stripped of duplicate steps
¶ Setup the DBMS
- On each database, ensure that
NT AUTHORITY\NETWORK SERVICEand a SQL Login namedSQLLoginwith passwordp4ssw0rdis added as adbowner. - Add an empty database named
CEF_20193_DEV - Go to the database backup files:
\\fileshare.corp.claritymis.com\NASShare2\Data\Database\SQLB\- Find one named
DNN9_CEF_2019_2and copy the latest .bak file in it's folder to your local - Restore it to your local
- Right-click the "Databases" folder, then click "Restore Files and Filegroups..."
- Click "Device", click "...", then click "Add"
- For "Backup Location:" enter location of "DNN9_CEF_backup.bak", then click "OK"
- For the database name, enter "DNN9_20193"
- Verify the Security logins are on these databases
- After CEF is run for the first time, add translations:
- In the CEF Master UI Translations Sheet , go to the Translations-Stats tab, and copy the cell F1. Paste this into the empty query and run it with F5.
- Once it finishes running, delete everything in the query, and replace it with a copy/paste of cells F2 – F16 from Translations-Stats and run the new query.
- In CEF Master UI Translations Sheet, go to the Translation-Store tab, select the first execute in cell U2, and use the hotkeys Ctrl+Shift+Left Arrow and Ctrl+Shift+Down Arrow to select all the columns. Copy/paste this into a new SQL query and do the same for the for the executes in Translations-Admin tab into the same query. Hit F5 to execute the query.
¶ Setup the local config files
- Copy the "Solution Items" folder from "C:\Data\Projects\CEF-Configs\CEF-2019.3" into the "C:\Data\Projects\2019.3_DEV\CEF" folder
- Open the "C:\Data\Projects\2019.3\CEF\Solution Items" folder
- Open the "appSettings.config" file in any text editor/IDE
- Edit the settings to match your environment local paths and urls
- Search for and open the "connectionStrings.config" files in any text editor/IDE
- Replace "SQLB.corp.claritymis.com \SQL2016" with ".\SQL2016" or the appropriately named SQL instance
- Replace "user id=SQLLogin;password=p4ssw0rd;" with "Integrated Security=true;" or with the domain login information for the desired user.
- Ensure "Initial Catalog=" is set to the correct database name from above (i.e. the CEF database).
- web.connectionStrings.config (DNN)
- Copy the contents of the "D:\Data\Projects\CEF-Configs\WEB9-2019.2" folder into the "D:\Data\Projects\2019.3_DEV\WEB9" folder
- Open the copied "web.connectionStrings" file in an text editor/IDE
- Ensure "Initial Catalog=" is set to "DNN_20193"
¶ Build the CEF project
Open the CEF .sln file in VS Restore Nuget Packages
- Right click the solution and Restore NuGet Packages
- .sln should now build
¶ Build the WEB project
Open file explorer to C:\Data\Projects\2019.3\_DEV\CEF\08.Clarity.Ecommerce.UI
- Right-click
npm-uber-install.batand run as administrator Open command prompt cd C:\Data\Projects\2019.3\_DEV\CEF\08.Clarity.Ecommerce.UIor type cmd in the file path of this foldergulp build